SetDPI Utility Version 2

View source on GitHub.

A couple of years ago I made a small command-line program for setting the DPI/PPI of PNG files. I used the System.Drawing.Bitmap class (i.e. GDI+) to set this property, which had the unfortunate side effect of producing relatively bloated files. Given that the chunk specifying this property is only 21 bytes long, I thought I could do better.

SetDPI version 2 searches for the pHYs chunk and updates it directly, or adds it immediately before the first IDAT chunk if it doesn’t already exist. Files produced by this tool will be at most 21 bytes larger than the original (or the same size when the pHYs chunk was already present).

SetDPI.7z
13,478 bytes; SHA-1: 800D83A390F2AD80772D79D7FB45C7EAAB0D4294
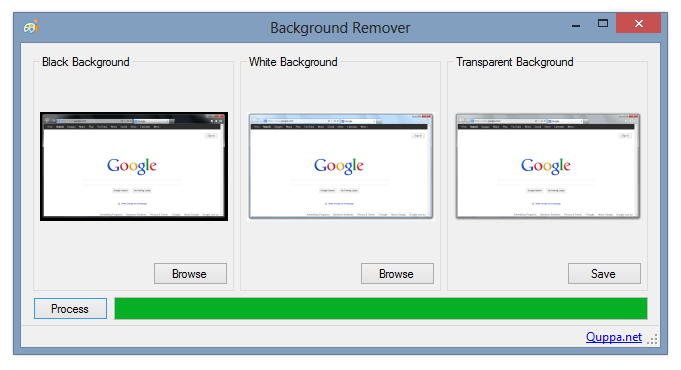
Image Background Remover Tool

View source on GitHub.

Inspired by Window Clippings, my preferred screenshot tool (which unfortunately crashes a lot under Windows 8 RTM), I wrote a small program for making image backgrounds transparent.

Screenshot of Background Remover

It comes with a command-line interface and a basic GUI (pictured above). The GUI supports dragging-and-dropping images, and you can switch the black and white images by right-clicking on either. The source code is included, along with a sample set of images.

The command-line syntax is: BackgroundRemover.exe imageout imageblack imagewhite

Thanks are owed to Ian Griffiths for the equations used to calculate transparency.

BackgroundRemover.7z
478,473 bytes; SHA-1: 002CF9C89B918951BBC7DECB9F9C1A8D53008E1F

Pixel-perfect Multi-DPI Images in WPF (Part 3)

View source on GitHub.

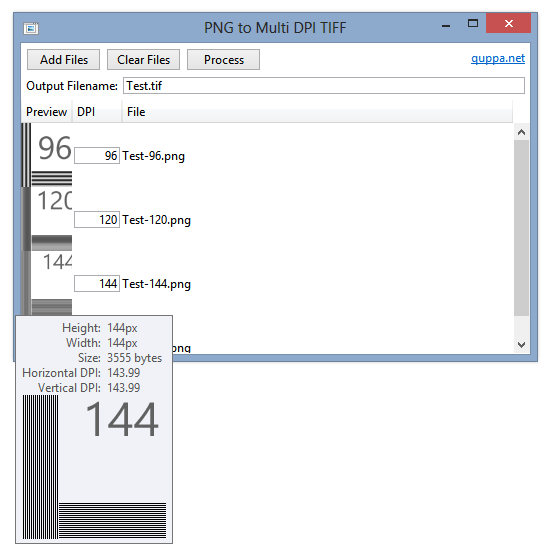
In Part 1 of this series, I discussed the problem of displaying different bitmap images at different DPIs in WPF. In Part 2, I proposed a solution using multi-frame TIFFs and two simple markup extensions. In this final post I will present a basic program that takes multiple images (PNG recommended), gives the option to specify the DPI of each and generates a multi-frame TIFF file accordingly.

Screenshot of PNG to Multi-DPI TIFF Program

I think the UI is self-explanatory. The program attempts to provide an output filename based on the pattern of the names of the input files. Alternatively, you can specify an absolute or relative file URI of your own.

Add files to the list by dragging and dropping them onto the window or click ‘Add Files’. Hovering over an image will display the unscaled image (to a point) in a tooltip, as shown above.

As mentioned in the previous post, avoid using PNGOUT or the like to compress your images – the Windows TIFF decoder has some issues displaying TIFF files made from highly-compressed PNGs.

Apologies to Microsoft for nicking an icon from imageres.dll.

The download includes the program binary (signed) and source (which isn’t particularly well structured or documented).

PNGToMultiDPITIFF.7z
156,593 bytes; SHA-1: 4CD2D2A7F7CE124A95D7900CBE89CAA1E0310790

P/Invoke and ChooseFont (Comdlg32.dll)

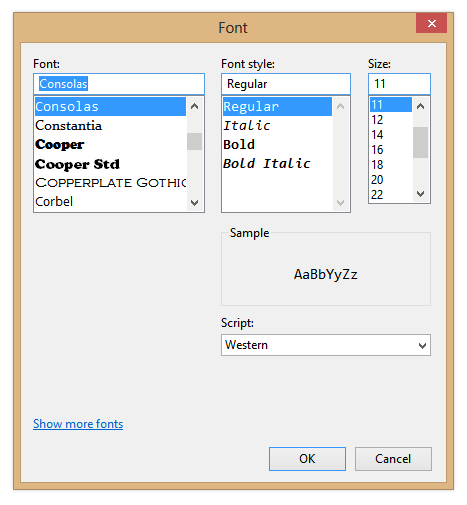
Mister Goodcat wrote a good article a little while ago about using P/Invoke in Silverlight 5 to display the native font chooser dialog with the ChooseFont function. I couldn’t get the code working for a 64-bit executable, however, as the definition of the CHOOSEFONT structure on MSDN he used as a basis for the managed implementation doesn’t match with what’s in the Windows SDK. I’ve created a page on PInvoke.net for the function that includes a definition of CHOOSEFONT that works in both 32-bit and 64-bit versions of Windows.

Screenshot of Font Chooser Dialog

Retrieving Windows 8 Theme Colours

See also: Windows 8 Theme Colours Reference.

Windows 8 doesn’t offer developers access to system theme colours, unlike its cousin, Windows Phone. Even for a version 1 product, this seems like a strange omission. Then again, we still don’t have a working public API for retrieving the Aero glass colour (or whatever we call it now that Aero’s gone) 6 years after the release of Windows Vista.

The functions that the system uses to retrieve colours are defined in UxTheme.dll. In particular, we’re interested in GetImmersiveColorSetCount (export #94), GetImmersiveColorFromColorSetEx (export #95), GetImmersiveColorTypeFromName (export #96), GetImmersiveUserColorSetPreference (export #98) and GetImmersiveColorNamedTypeByIndex (export #100). Relying on undocumented functions is a bad idea, and will cause your program to fail certification, so you won’t be able to use them in apps distributed through the Windows Store anyway.

For desktop developers who still want to use these functions, read on. Just assume that they’ll break in future versions of Windows (or even with patches to Windows 8).

Screenshot of Windows 8 Colours

Continue reading “Retrieving Windows 8 Theme Colours”

Windows 7-style Notification Area Applications in WPF: Recap & Sample

View source on GitHub.

Over the past month I’ve looked at how to implement a Windows 7-style notification area application in WPF.

I covered 6 different topics:

As promised, I’ve put together a small sample project to illustrate all this code working together (with some added polish):

NotifyIconSample.7z
42,775 bytes; SHA-1: 513E998F4CCFC8C5BB6CA9F8001DA204C80FDF3A

The code has a good level of documentation, but I recommend you read the above posts to understand the ideas behind it.

Windows 7-style Notification Area Applications in WPF: Part 6 (Notify Icon Position: Pre-Windows 7)

View source on GitHub.

In Part 2 of this series I demonstrated how to use the Shell_NotifyIconGetRect function to find the position of a notify icon. This function is new to Windows 7, however, and we must find a different solution for earlier versions of Windows.

This turns out to be quite difficult. A post on the MSDN forums by user parisisinjail provided a good starting point, and it led me to a Code Project article by Irek Zielinski that explained exactly what to do – in native code. This post shows how to implement this kind of approach in managed code.

I have verified that the following code works with Windows XP and Vista. It also works under Windows 7, but only when the icon is not located in the notification area fly-out (not found in previous versions). As such, this solution should only be used when Shell_NotifyIconGetRect is not available.

The basic idea is that the notification area is actually just a special Toolbar control, with each icon being a toolbar button. We want to find the toolbar control and loop over the buttons until we find the one that corresponds to our notify icon. We can then find the coordinates of the toolbar button. (The fly-out in Windows 7 has a separate toolbar control, so you could search that instead of using Shell_NotifyIconGetRect if you really wanted to.)

The process sounds straight forward, but the implementation is quite tricky. Read on for the code.

Continue reading “Windows 7-style Notification Area Applications in WPF: Part 6 (Notify Icon Position: Pre-Windows 7)”

Windows 7-style Notification Area Applications in WPF: Part 5 (Fixing Aero Borders)

View source on GitHub.

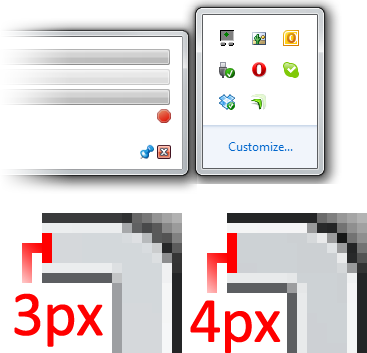
An issue that came to my attention only recently is that the borders of WPF (update: WPF is not actually to blame) windows without captions/title-bars (that is, with ResizeMode set to ‘CanResize’ and WindowStyle set to ‘None’) are drawn incorrectly when the DWM (read: Aero Glass) is enabled. Specifically, the upper and left borders are drawn one pixel too thin (e.g. 3 pixels when the system setting is 4 pixels) and the colour of the bottom and right borders is different to that of other windows. I’ve tried to illustrate these differences in the screenshot below (the image on the left is of a WPF window).

Aero Border Example

It is conceivable that this will be fixed in a future version of WPF Windows, but for now we can use the DwmExtendFrameIntoClientArea function to do it manually. This is only necessary when the DWM is enabled, of course.

Continue reading “Windows 7-style Notification Area Applications in WPF: Part 5 (Fixing Aero Borders)”

Windows 7-style Notification Area Applications in WPF: Part 4 (Multiple Monitors)

View source on GitHub.

At the end of Part 3 in this series, I noted that the window positioning logic depends on accurately getting the bounds of the monitor where the notify icon is located. Specifically, we require the bounds of the working area (the space on the monitor excluding the taskbar and other docked items). WPF gives us the System.Windows.SystemParameters.WorkArea property, but this gives us the area of the primary display monitor’s working area, and the taskbar (and thus notify icon) might be located on a different monitor. Unfortunately, support for accessing information about anything other than the primary monitor with the SystemParameters class seems to be absent as of .NET 4.0.

We could use the System.Windows.Forms.Screen class to easily solve this problem: the System.Windows.Forms.Screen.GetWorkingArea method has an overload for finding the working area of the monitor that contains a given rectangle, which is exactly what we need to do. However, I am going to opt to use Win32, instead, simply to avoid depending on WinForms (yes, I realise that sounds a bit strange given that this project revolves around a System.Windows.Forms.NotifyIcon). In any case, there is something to be said for knowing what it is that all these .NET functions wrap around 🙂

The two functions we’ll use are MonitorFromRect (to find the handle of the monitor containing the notify icon) and GetMonitorInfo (to get the working area of that monitor).

Continue reading “Windows 7-style Notification Area Applications in WPF: Part 4 (Multiple Monitors)”

Windows 7-style Notification Area Applications in WPF: Part 3 (Taskbar Position)

View source on GitHub.

In the previous post in this series, I showed how to find the location of a notify icon by implementing the new Windows 7 Shell32.dll function Shell_NotifyIconGetRect in managed code for use with the System.Windows.Forms.NotifyIcon class.

In this post, I will look at how to accurately position a window above (or adjacent to) a notify icon, no matter the location of the taskbar (barring a certain issue that I note at the end of this post :)). As I noted in Part 2, the current version of Keiki is hardcoded to appear in the bottom right-hand corner of the user’s screen, making it very out of place when the taskbar is moved to the top/right/left of the screen. We’ll need to delve into the Win32 API once again, but as in Part 2 the amount of code required is not daunting, even for a Win32 beginner like me.

Continue reading “Windows 7-style Notification Area Applications in WPF: Part 3 (Taskbar Position)”