SetDPI Utility Version 2

View source on GitHub.

A couple of years ago I made a small command-line program for setting the DPI/PPI of PNG files. I used the System.Drawing.Bitmap class (i.e. GDI+) to set this property, which had the unfortunate side effect of producing relatively bloated files. Given that the chunk specifying this property is only 21 bytes long, I thought I could do better.

SetDPI version 2 searches for the pHYs chunk and updates it directly, or adds it immediately before the first IDAT chunk if it doesn’t already exist. Files produced by this tool will be at most 21 bytes larger than the original (or the same size when the pHYs chunk was already present).

SetDPI.7z
13,478 bytes; SHA-1: 800D83A390F2AD80772D79D7FB45C7EAAB0D4294

Retaining DPI/PPI Information with PNGGauntlet

I’ve mentioned PNGGauntlet many times on this blog – it’s a great tool for squeezing the best compression ratios out of the PNG format. It combines the tools PNGOUT, OptiPNG and DeflOpt in a nice WinForms GUI.

As part of the compression process, most chunks are removed by default. This includes the pHYs chunk, which defines the DPI/PPI of the image – an important property when dealing with WPF. To make sure this chunk isn’t deleted, add ‘pHYs’ under ‘Chunks to keep’ (PNGOUT) and check the ‘Preserve PNG metadata’ box for DeflOpt.

Pixel-perfect Multi-DPI Images in WPF (Part 3)

View source on GitHub.

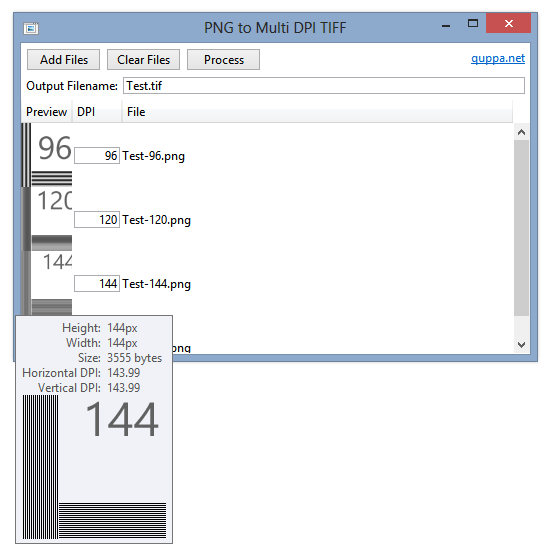
In Part 1 of this series, I discussed the problem of displaying different bitmap images at different DPIs in WPF. In Part 2, I proposed a solution using multi-frame TIFFs and two simple markup extensions. In this final post I will present a basic program that takes multiple images (PNG recommended), gives the option to specify the DPI of each and generates a multi-frame TIFF file accordingly.

Screenshot of PNG to Multi-DPI TIFF Program

I think the UI is self-explanatory. The program attempts to provide an output filename based on the pattern of the names of the input files. Alternatively, you can specify an absolute or relative file URI of your own.

Add files to the list by dragging and dropping them onto the window or click ‘Add Files’. Hovering over an image will display the unscaled image (to a point) in a tooltip, as shown above.

As mentioned in the previous post, avoid using PNGOUT or the like to compress your images – the Windows TIFF decoder has some issues displaying TIFF files made from highly-compressed PNGs.

Apologies to Microsoft for nicking an icon from imageres.dll.

The download includes the program binary (signed) and source (which isn’t particularly well structured or documented).

PNGToMultiDPITIFF.7z
156,593 bytes; SHA-1: 4CD2D2A7F7CE124A95D7900CBE89CAA1E0310790

Pixel-perfect Multi-DPI Images in WPF (Part 2)

View source on GitHub.

See also: Part 1 and Part 3.

In Part 1 of this series, I explored the issue of displaying pixel-perfect bitmap images in the Windows Presentation Foundation. In this article, I’ll describe a method of displaying different images depending on the system DPI setting using a custom Markup Extension and multi-image TIFF files.

Tagged Image File Format (TIFF) files may contain multiple images, and WPF contains support for this format out of the box. You can use the TiffBitmapEncoder class to combine multiple images into one TIFF – I made a tool called PNGToMultiDPITIFF that does just this, but I’ll leave that to Part 3.

To pick the best-matching image from a multi-frame TIFF, I created two Markup Extensions – one for creating an ImageSource, and one for setting the image’s BitmapScalingMode. If the TIFF contains an exact match for the current DPI, the BitmapScalingMode can be set to NearestNeighbour (as there should be no scaling). If not, it will be set to ‘Unspecified’ (which means ‘Linear’ in WPF 4 or newer) so it looks better.

MultiDPIImage.7z
1,229 bytes; SHA-1: BB0B8867C48ECEADD7655E792DAA780A30299747

You can download the code for the Markup Extensions above.

As discussed in the previous post, remember to set UseLayoutRounding and SnapToDevicePixels to true on your Windows.

Code Discussion

The code for the markup extension is quite simple. To get the image frames, we use the TiffBitmapDecoder class:

We loop through the frames to see if any match the system DPI. If there is no exact match, the first frame with a DPI above the system DPI is selected. If there is no such frame, we just pick the frame with the highest DPI.

The code for choosing the BitmapScalingMode is similar – instead of returning an image, we return ‘NearestNeighbour’ if there is an exact DPI match or ‘Unspecified’ otherwise. If you want to use a different BitmapScalingMode fallback, you can specify an optional second paramater in MultiDPIImageScalingMode:

Drawbacks

  • Images set with the markup extension will not be visible in the WPF designer (Visual Studio or Blend). I’d welcome any suggestions on how to fix this.
  • Avoid using PNGOUT or PNGGauntlet on PNG images before putting them into multi-frame TIFF files. The Windows TIFF decoder has some issues with compressed PNGs.

Pixel-perfect Multi-DPI Images in WPF (Part 1)

View source on GitHub.

See also: Part 2 and Part 3.

I’ve written previously about DPI-awareness in the Windows Presentation Foundation and how to specify measurements in pixels rather than Device Independent Units (DIUs). Something else to consider is image scaling – unlike the Windows Ribbon control or WinRT, WPF has no in-built mechanism for displaying different images according to the system’s DPI setting. This is a nuisance.

To illustrate the problem, I created 5 images. Left-to-right, the image DPIs (vertical and horizontal) are: 72, 96, 120, 144 and 192. The image dimensions are: 32x32px, 32x32px, 40x40px, 48x48px and 64x64px. I purposely used single-pixel-wide lines to make any stretching obvious.

Original Images

Read on to see what WPF does with these images.

Continue reading “Pixel-perfect Multi-DPI Images in WPF (Part 1)”

Keiki Usage Meter 3.1.0 Released

I’ve released an update for Keiki Usage Meter. There has been a lot of behind-the-scenes work, but the user experience hasn’t changed drastically. Visit the website to find out what’s new.

I’m using this program as something of a testbed for some engineering work that I’ll talk about in future posts, including supporting pixel-perfect bitmap images at multiple DPI settings in WPF and using the Visual Styles APIs to draw native-looking controls (with animation). I’ve also taken the opportunity to learn a bit about localising programs, and v3.1.0 contains three user interface languages: English (Australia), English (United States) and Japanese (Japan) – thanks to Miho Inaba (稲葉美穂) for help with the latter.

SetDPI Utility

View source on GitHub.

Updated 2013-01-06.

Ken Silverman’s PNG compression tool PNGOUT (complemented nicely by the free .NET frontend PNGGauntlet) can be remarkably effective at trimming the size of PNGs without altering the image described within.

However, in its quest to remove anything non-essential, PNGOUT by default strips out the image’s DPI (in fact PPI) information. PNGs without PPI information will be treated differently by different software.

WPF either uses a default of 96 or the current system DPI with such images (I’m not sure which, but the latter makes more sense). Sometimes this can have nice side-effects, as Scott Hanselman discovered – images that were designed for 96 PPI but set to 72 PPI were suddenly ‘fixed’ (at least when the application was run in a 96 DPI environment). Better than relying on WPF’s interpretation of PNGs without PPI information is to correctly set the PPI in the first place. For example, if an image is designed for 120 DPI but has its PPI set to 96, WPF will (correctly) try and scale the image, which is clearly not desirable.

PNGOUT features a command line option /k# for removing or keeping optional chunks. The pHYs chunk holds the PPI information, which is what we want to leave alone. Using the command line option /kpHYs with PNGOUT will thus preserve PPI information. (Information from WulfTheSaxon.)

Sometimes, though, it is useful to have a utility that sets PPI information for lots of images at once (the PPI information in the PNGs may not be correct before using PNGOUT, for instance, rendering the /kpHYs switch pointless).

Josip Medved had the same thought and created a tool for setting the PPI to 96 for many images at once.

I decided to slightly extend his tool to take the desired horizontal and vertical PPI as command line arguments. The source and binaries can be downloaded here (SHA-1: 800D83A390F2AD80772D79D7FB45C7EAAB0D4294). The usage is SetDPI dpiX dpiY filepattern1 [filepattern2 […]].

Examples:

  • SetDPI 96 96 *.png (sets all PNG files to 96 PPI)
  • SetDPI 120 120 a.png b.png c.png (sets a.png, b.png and c.png to 120 PPI)
  • SetDPI 144 144 C:Images*.png (sets all PNG images in directory C:Images to 144 PPI)

Pixel Measurements in WPF

Part of the beauty of the Windows Presentation Foundation is that it is designed to be resolution independent – that is, a WPF application should scale perfectly no matter the system’s DPI setting (excluding any bitmap graphics, which mightn’t look as nice as the vector parts).

Instead of measuring things in pixels, WPF uses Device Independent Units (DIUs). If you only ever use 96 DPI (100%), you won’t notice the difference: at that setting, 1 pixel is the same as 1 DIU. Increase the system DPI, though, and this will no longer hold true. For example, at 120 DPI (125%), 1 DIU will be represented as 1.25 pixels. At 144 DPI (150%), 1 DIU = 1.5 pixels. At 192 DPI (200%), 1 DIU = 2 pixels.

Notice that at 120 DPI and 144 DPI, the number of pixels in 1 DIU is not an integer. In cases like these – when edges fall in the middle of screen pixels – WPF uses anti-aliasing by default. This can, however, result in lines that seem blurry (after all, that’s what anti-aliasing does). If this behaviour is undesirable, one can use UIElement’s SnapsToDevicePixels property.

WPF’s built-in handling of DPI scaling is great: in most cases, it should be transparent to both the programmer and user.

Sometimes, though, one might want to measure lengths in pixels, not DIUs. For example, Keiki’s custom window border for when the DWM (Aero) is disabled needs to be 1 pixel thick at any DPI (this is how the system’s notification area applications look). So, how can we specify this?

First, we need to get the system’s DPI setting:

dpiX and dpiY will hold values like 1.0 (96 DPI), 1.25 (120 DPI), 1.5 (144 DPI) and 2.0 (192 DPI).

To specify a pixel measurement, we simply divide the DIU measurement by the DPI factor (dpiX and dpiY should always be the same – at least in Windows 7 and earlier):

This will make the margin 3 pixels thick at any DPI. (For example, at 120 DPI, dpiX = 1.25. 3 / 1.25 = 2.4 DIUs. 2.4 DIUs will be converted by WPF to 3 pixels.)

Fedir Nepyivoda has a neat solution to this problem: instead of manually converting DIU measurements, he created a PixelBorder control (inheriting from Border) that overrides MeasureOverride. Have a look here.
Small Icon Size & DPI in Windows

The GetSystemMetrics function in Windows retrieves system metrics and configuration settings. One such metric is the recommended size (width and height) of ‘small icons’:

Small icons typically appear in window captions and in small icon view.

Another place where small icons show up is the notification area.

MSDN contains a guide to Creating DPI-Aware Applications. It notes the challenge posed by raster graphics and different DPIs. Unlike vector graphics, which can scale without a loss in quality, distinct raster images must be created for different resolutions in order to avoid unpleasant scaling artefacts. (In fact, this is perhaps overstating the benefits of vector graphics: the level of detail suitable for a high-resolution image is not necessarily suitable for a low-resolution image, so using the same vector for all sizes doesn’t always make sense.) Windows icons, as of Windows 7, contain only raster graphics.

Small Icon Sizes

The small icon size varies according to the system DPI and OS version:

DPI Setting Windows 7, XP Windows Vista
96 (Default, 100%) 16×16 16×16
120 (125%) 20×20 22×22
144 (150%) 24×24 26×26
192 (200%) 32×32 36×36

The sizes for Windows Vista (apart from the size at 96 DPI) don’t make much sense – they don’t match up with the DPI scaling ratio. It is possible that this was a mistake, hence the change in Windows 7.

So, if you want to make sure your small icon (e.g. notify icon) looks beautiful under the widest possible range of systems, you should ideally include the images with the sizes 16×16, 20×20, 22×22, 24×24, 26×26, 32×32 and 36×36. If that sounds like a lot of work (it shouldn’t be with a high quality tool like Axialis IconWorkshop), Microsoft’s own recommendation is to include 16×16 and 32×32 pixel icons. Keep in mind, though, that scaling either of those sizes to 20×20 or 22×22 pixels can result in a rather awful-looking icon. While it is still rare to see anything but the default setting of 96 DPI, this will not be the case forever.

WinForms Icon Sizes

When using the System.Drawing.Icon class, it is a good idea to use one of the constructors that takes the icon size as a parameter.

Windows Forms conveniently exposes a property called SmallIconSize in the SystemInformation class. This property gives us a System.Drawing.Size corresponding to values listed above, which we can put straight into our icon constructor:

The equivalent properties in WPF are SystemParameters.SmallIconWidth and SystemParameters.SmallIconHeight.

Both WPF and WinForms wrap around the Win32 GetSystemMetrics function taking the arguments SM_CXSMICON (small icon width) and SM_CYSMICON (small icon height).