Theming & Visual Styles in Windows 8

The following is based on the Windows Developer Preview and might not accurately represent the final version of Windows 8.

A significant change in Windows 8 is the removal of support for Windows classic theming. In the Windows Developer Preview, there is no Windows Classic theme, and all themes (including Windows Basic and the four high contrast themes) use the Desktop Window Manager (DWM) for desktop composition (in Windows Vista and Windows 7, it was only enabled for Aero themes).

While some users may miss the Windows Classic theme (it might return in later builds, of course), this is definitely a positive development. All themes will receive the benefits of hardware acceleration, and there will no longer be the need to maintain a separate code path for when the DWM is disabled (as long as the program targets only Windows 8 or later).

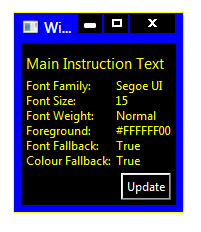
In order to maintain compatibility with earlier versions of Windows, when a high contrast theme is selected, Windows 8 will simulate the Windows classic theming model unless an application specifies Windows 8 as a supported OS in its application manifest. The sample program I made for the previous post did not include such a manifest, so it doesn’t work correctly in the Windows Developer Preview with high contrast themes:WPF sample without manifest
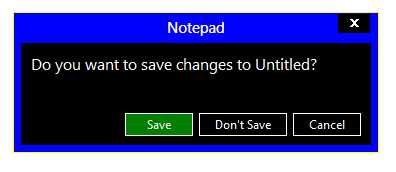
Compare this to a task dialog:

Task Dialog (High Contrast #1)

(The button in the WPF window is also drawn incorrectly, but presumably that will be fixed in .NET 4.5.)

Adding the appropriate manifest to the application causes it to work as it should:
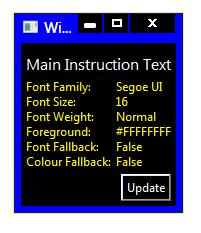
WPF sample with manifest

I’ve updated the sample code in the previous post to include the manifest file.
Windows 7-style Notification Area Applications in WPF: Part 6 (Notify Icon Position: Pre-Windows 7)

View source on GitHub.

In Part 2 of this series I demonstrated how to use the Shell_NotifyIconGetRect function to find the position of a notify icon. This function is new to Windows 7, however, and we must find a different solution for earlier versions of Windows.

This turns out to be quite difficult. A post on the MSDN forums by user parisisinjail provided a good starting point, and it led me to a Code Project article by Irek Zielinski that explained exactly what to do – in native code. This post shows how to implement this kind of approach in managed code.

I have verified that the following code works with Windows XP and Vista. It also works under Windows 7, but only when the icon is not located in the notification area fly-out (not found in previous versions). As such, this solution should only be used when Shell_NotifyIconGetRect is not available.

The basic idea is that the notification area is actually just a special Toolbar control, with each icon being a toolbar button. We want to find the toolbar control and loop over the buttons until we find the one that corresponds to our notify icon. We can then find the coordinates of the toolbar button. (The fly-out in Windows 7 has a separate toolbar control, so you could search that instead of using Shell_NotifyIconGetRect if you really wanted to.)

The process sounds straight forward, but the implementation is quite tricky. Read on for the code.

Continue reading “Windows 7-style Notification Area Applications in WPF: Part 6 (Notify Icon Position: Pre-Windows 7)”

Windows 7-style Notification Area Applications in WPF: Part 5 (Fixing Aero Borders)

View source on GitHub.

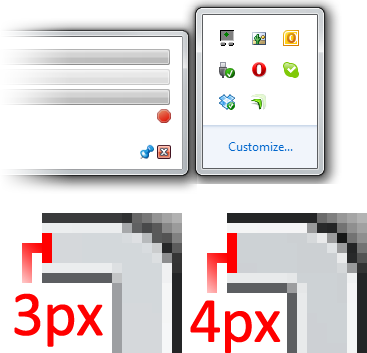
An issue that came to my attention only recently is that the borders of WPF (update: WPF is not actually to blame) windows without captions/title-bars (that is, with ResizeMode set to ‘CanResize’ and WindowStyle set to ‘None’) are drawn incorrectly when the DWM (read: Aero Glass) is enabled. Specifically, the upper and left borders are drawn one pixel too thin (e.g. 3 pixels when the system setting is 4 pixels) and the colour of the bottom and right borders is different to that of other windows. I’ve tried to illustrate these differences in the screenshot below (the image on the left is of a WPF window).

Aero Border Example

It is conceivable that this will be fixed in a future version of WPF Windows, but for now we can use the DwmExtendFrameIntoClientArea function to do it manually. This is only necessary when the DWM is enabled, of course.

Continue reading “Windows 7-style Notification Area Applications in WPF: Part 5 (Fixing Aero Borders)”

Windows 7-style Notification Area Applications in WPF: Part 4 (Multiple Monitors)

View source on GitHub.

At the end of Part 3 in this series, I noted that the window positioning logic depends on accurately getting the bounds of the monitor where the notify icon is located. Specifically, we require the bounds of the working area (the space on the monitor excluding the taskbar and other docked items). WPF gives us the System.Windows.SystemParameters.WorkArea property, but this gives us the area of the primary display monitor’s working area, and the taskbar (and thus notify icon) might be located on a different monitor. Unfortunately, support for accessing information about anything other than the primary monitor with the SystemParameters class seems to be absent as of .NET 4.0.

We could use the System.Windows.Forms.Screen class to easily solve this problem: the System.Windows.Forms.Screen.GetWorkingArea method has an overload for finding the working area of the monitor that contains a given rectangle, which is exactly what we need to do. However, I am going to opt to use Win32, instead, simply to avoid depending on WinForms (yes, I realise that sounds a bit strange given that this project revolves around a System.Windows.Forms.NotifyIcon). In any case, there is something to be said for knowing what it is that all these .NET functions wrap around 🙂

The two functions we’ll use are MonitorFromRect (to find the handle of the monitor containing the notify icon) and GetMonitorInfo (to get the working area of that monitor).

Continue reading “Windows 7-style Notification Area Applications in WPF: Part 4 (Multiple Monitors)”

Windows 7-style Notification Area Applications in WPF: Part 3 (Taskbar Position)

View source on GitHub.

In the previous post in this series, I showed how to find the location of a notify icon by implementing the new Windows 7 Shell32.dll function Shell_NotifyIconGetRect in managed code for use with the System.Windows.Forms.NotifyIcon class.

In this post, I will look at how to accurately position a window above (or adjacent to) a notify icon, no matter the location of the taskbar (barring a certain issue that I note at the end of this post :)). As I noted in Part 2, the current version of Keiki is hardcoded to appear in the bottom right-hand corner of the user’s screen, making it very out of place when the taskbar is moved to the top/right/left of the screen. We’ll need to delve into the Win32 API once again, but as in Part 2 the amount of code required is not daunting, even for a Win32 beginner like me.

Continue reading “Windows 7-style Notification Area Applications in WPF: Part 3 (Taskbar Position)”

Windows 7-style Notification Area Applications in WPF: Part 2 (Notify Icon Position)

View source on GitHub.

You may have noticed that the notification area applications in Windows 7 (Volume/Power/Network/Action Centre) appear centred above their icon. I wanted Keiki to do the same; the current version is hardcoded to sit in the bottom right of the screen, which causes a few problems:

  1. The taskbar position is not taken into account; the window will be in the bottom right even if the taskbar is at the top of the screen.
  2. The window appears on top of the new Windows 7 fly-out interface for hiding notify icons if the Keiki icon is kept there.

In this post, I will demonstrate how to retrieve the location of a System.Windows.Forms.NotifyIcon with a function new to shell32.dll in Windows 7: Shell_NotifyIconGetRect. Windows Vista unfortunately lacks this function: I will cover the approach I use in Vista in a later post.

Thanks to Frédéric Hamidi for pointing me in the right direction.

Continue reading “Windows 7-style Notification Area Applications in WPF: Part 2 (Notify Icon Position)”

Windows 7-style Notification Area Applications in WPF: Part 1 (Removing Resize)

View source on GitHub.

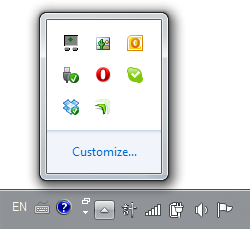
Keiki, my OptusNet Usage Meter, is designed to sit in the notification area (or system tray, if you prefer) and behave similarly to the default system ‘applets’ (Volume/Network/Action Centre/Power). That is, the application becomes visible with a single left click on the notify (tray) icon, and is hidden again when focus is lost.Notification Area

I have recently started to refactor Keiki’s code, as I have learnt a lot about WPF since I first wrote the application. While refactoring I’ve also tried to polish a few rough edges: one of these is the main window’s resize behaviour. The Windows 7 (and Vista before it) tray applications (excuse the ever-changing terminology) have no title bar and are not resizable. It turns out that this window style isn’t trivial to implement with WPF.

Updated: improved code to focus application when border is clicked.

Continue reading “Windows 7-style Notification Area Applications in WPF: Part 1 (Removing Resize)”