SetDPI Utility Version 2

View source on GitHub.

A couple of years ago I made a small command-line program for setting the DPI/PPI of PNG files. I used the System.Drawing.Bitmap class (i.e. GDI+) to set this property, which had the unfortunate side effect of producing relatively bloated files. Given that the chunk specifying this property is only 21 bytes long, I thought I could do better.

SetDPI version 2 searches for the pHYs chunk and updates it directly, or adds it immediately before the first IDAT chunk if it doesn’t already exist. Files produced by this tool will be at most 21 bytes larger than the original (or the same size when the pHYs chunk was already present).

SetDPI.7z
13,478 bytes; SHA-1: 800D83A390F2AD80772D79D7FB45C7EAAB0D4294
Retaining DPI/PPI Information with PNGGauntlet

I’ve mentioned PNGGauntlet many times on this blog – it’s a great tool for squeezing the best compression ratios out of the PNG format. It combines the tools PNGOUT, OptiPNG and DeflOpt in a nice WinForms GUI.

As part of the compression process, most chunks are removed by default. This includes the pHYs chunk, which defines the DPI/PPI of the image – an important property when dealing with WPF. To make sure this chunk isn’t deleted, add ‘pHYs’ under ‘Chunks to keep’ (PNGOUT) and check the ‘Preserve PNG metadata’ box for DeflOpt.

Pixel-perfect Multi-DPI Images in WPF (Part 3)

View source on GitHub.

In Part 1 of this series, I discussed the problem of displaying different bitmap images at different DPIs in WPF. In Part 2, I proposed a solution using multi-frame TIFFs and two simple markup extensions. In this final post I will present a basic program that takes multiple images (PNG recommended), gives the option to specify the DPI of each and generates a multi-frame TIFF file accordingly.

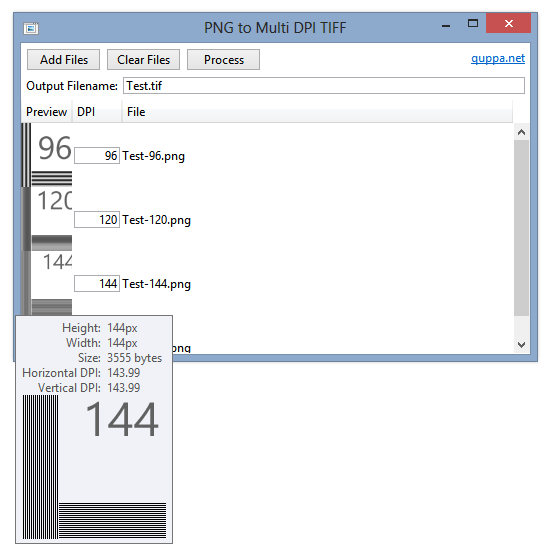
Screenshot of PNG to Multi-DPI TIFF Program

I think the UI is self-explanatory. The program attempts to provide an output filename based on the pattern of the names of the input files. Alternatively, you can specify an absolute or relative file URI of your own.

Add files to the list by dragging and dropping them onto the window or click ‘Add Files’. Hovering over an image will display the unscaled image (to a point) in a tooltip, as shown above.

As mentioned in the previous post, avoid using PNGOUT or the like to compress your images – the Windows TIFF decoder has some issues displaying TIFF files made from highly-compressed PNGs.

Apologies to Microsoft for nicking an icon from imageres.dll.

The download includes the program binary (signed) and source (which isn’t particularly well structured or documented).

PNGToMultiDPITIFF.7z
156,593 bytes; SHA-1: 4CD2D2A7F7CE124A95D7900CBE89CAA1E0310790

Pixel-perfect Multi-DPI Images in WPF (Part 1)

View source on GitHub.

See also: Part 2 and Part 3.

I’ve written previously about DPI-awareness in the Windows Presentation Foundation and how to specify measurements in pixels rather than Device Independent Units (DIUs). Something else to consider is image scaling – unlike the Windows Ribbon control or WinRT, WPF has no in-built mechanism for displaying different images according to the system’s DPI setting. This is a nuisance.

To illustrate the problem, I created 5 images. Left-to-right, the image DPIs (vertical and horizontal) are: 72, 96, 120, 144 and 192. The image dimensions are: 32x32px, 32x32px, 40x40px, 48x48px and 64x64px. I purposely used single-pixel-wide lines to make any stretching obvious.

Original Images

Read on to see what WPF does with these images.

Continue reading “Pixel-perfect Multi-DPI Images in WPF (Part 1)”