Native Tooltips in WPF (Part 2)

View source on GitHub.

In part 1 of this article I looked at the differences between WPF tooltips and ‘native’ (Win32) tooltips. In this part I present a sample WPF application that displays native tooltips. I’d planned to walk through some of the code here, but that turned out to be a bit tedious, so you’ll have to make do with the comments in the sample.

NativeToolTip.7z
11,271 bytes; SHA-1: 4ABD39CE46F5386E6D2DFF4A788AC3231DFA8765

Limitations:

  • ToolTipService.Placement must be set to ‘Mouse’ (the default). Custom positioning is not available. (You could implement it with a tracking tooltip, but that’s easier said than done.)
  • Native tooltip content is limited to simple strings.

Remarks:

  • TTM_POPUP doesn’t work if the ‘rect’ field of the TOOLINFO isn’t set. This had me stumped for a while.

Native Tooltips in WPF (Part 1)

View source on GitHub.

<preamble>

One of my hobbies is getting WPF controls to look more like their native counterparts. I’ve been shoehorning the UxTheme APIs (and older equivalents when theming is unavailable) into something that can be used by WPF over the past year or more, and I’ll write about this process at some point in the future (I’ve implemented native-looking push buttons, radio buttons, checkboxes, scrollbars, list views/list view items, text boxes, group boxes and read-only combo boxes). These efforts pay off the most in Windows 8, since WPF’s theme for that OS leaves much to be desired (just look at the push buttons!). This isn’t entirely surprising given that the theme wasn’t finalised until post-RC, leaving the WPF team without much time to do a good job.

</preamble>

In this post I’ll compare WPF tooltips with Win32 tooltips, and in part 2 I’ll demonstrate how to use Win32 tooltips in a WPF application and post some sample code.

Tooltips in WPF look more or less like traditional Windows tooltip controls. Here are some advantages and disadvantages of each:

WPF Tooltips

Advantages:

  • Can host any content, not just text.
  • Style them like any WPF control.
  • Drop shadow fades in and out.

Disadvantages:

  • Colours aren’t quite the same as native tooltips.
  • Weird bottom margin/padding with Aero theme.
  • Drop shadows don’t look exactly like Win32 tooltip shadows.
  • Drop shadows are missing in the Windows 8 theme, regardless of system settings (can be fixed by modifying the control template, which is missing SystemDropShadowChrome, meaning the ‘HasDropShadow’ property does nothing).
  • No ClearType without RenderOptions.ClearTypeHint.

Win32 Tooltips

Advantages:

  • Consistent with tooltips in native applications.

Disadvantages:

  • Can only display text (displaying other things is non-trivial).
  • Can’t be styled.
  • Drop shadows don’t fade in or out.
  • Animations sometimes don’t fire (particularly the fade-in animation).
  • Updating the text of an open tooltip can cause redraw flicker.
  • Custom positioning can involve a lot of work.

There are some other very minor differences:

  • The algorithm for finding the position under the mouse is different in WPF, even though it’s based on the ‘_GetHcursorPdy3’ function from tooltips.cpp, according to the reference source.
  • When the content of a native tooltip changes, the tooltip will be repositioned beneath the cursor. WPF tooltips remain fixed in place.

WPF ToolTip Drop Shadows in Windows 8

The standard ToolTip control template for the Windows 8 theme in WPF (‘Aero2’) has no drop shadow, whether or not the HasDropShadow property is set. The background colour and margins are also slightly off compared to the native style.

The following template produces a result that’s closer to the real thing:

You’ll need to add a reference to PresentationFramework.Aero in your project (note the ‘themes’ namespace used in the control template).

Screenshot of Windows 8 Tooltips

The top image shows a standard Windows 8 tooltip, the middle shows the default tooltip appearance for WPF applications running in Windows 8, and the bottom shows a WPF tooltip using the above template. Note that the Win32 and WPF drop shadows are slightly different in appearance. Additionally, the WPF shadow fades in and out with the tooltip, while the Win32 shadow just pops in and out.

Now, you’ll only want to use this template when the user is running Windows 8, and if the user changes themes you’ll no longer have tooltips that match the native style.

Pixel-perfect Multi-DPI Images in WPF (Part 3)

View source on GitHub.

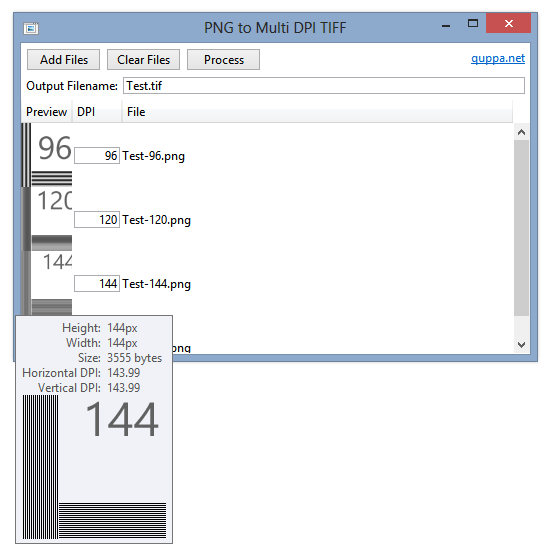
In Part 1 of this series, I discussed the problem of displaying different bitmap images at different DPIs in WPF. In Part 2, I proposed a solution using multi-frame TIFFs and two simple markup extensions. In this final post I will present a basic program that takes multiple images (PNG recommended), gives the option to specify the DPI of each and generates a multi-frame TIFF file accordingly.

Screenshot of PNG to Multi-DPI TIFF Program

I think the UI is self-explanatory. The program attempts to provide an output filename based on the pattern of the names of the input files. Alternatively, you can specify an absolute or relative file URI of your own.

Add files to the list by dragging and dropping them onto the window or click ‘Add Files’. Hovering over an image will display the unscaled image (to a point) in a tooltip, as shown above.

As mentioned in the previous post, avoid using PNGOUT or the like to compress your images – the Windows TIFF decoder has some issues displaying TIFF files made from highly-compressed PNGs.

Apologies to Microsoft for nicking an icon from imageres.dll.

The download includes the program binary (signed) and source (which isn’t particularly well structured or documented).

PNGToMultiDPITIFF.7z
156,593 bytes; SHA-1: 4CD2D2A7F7CE124A95D7900CBE89CAA1E0310790

Pixel-perfect Multi-DPI Images in WPF (Part 2)

View source on GitHub.

See also: Part 1 and Part 3.

In Part 1 of this series, I explored the issue of displaying pixel-perfect bitmap images in the Windows Presentation Foundation. In this article, I’ll describe a method of displaying different images depending on the system DPI setting using a custom Markup Extension and multi-image TIFF files.

Tagged Image File Format (TIFF) files may contain multiple images, and WPF contains support for this format out of the box. You can use the TiffBitmapEncoder class to combine multiple images into one TIFF – I made a tool called PNGToMultiDPITIFF that does just this, but I’ll leave that to Part 3.

To pick the best-matching image from a multi-frame TIFF, I created two Markup Extensions – one for creating an ImageSource, and one for setting the image’s BitmapScalingMode. If the TIFF contains an exact match for the current DPI, the BitmapScalingMode can be set to NearestNeighbour (as there should be no scaling). If not, it will be set to ‘Unspecified’ (which means ‘Linear’ in WPF 4 or newer) so it looks better.

MultiDPIImage.7z
1,229 bytes; SHA-1: BB0B8867C48ECEADD7655E792DAA780A30299747

You can download the code for the Markup Extensions above.

As discussed in the previous post, remember to set UseLayoutRounding and SnapToDevicePixels to true on your Windows.

Code Discussion

The code for the markup extension is quite simple. To get the image frames, we use the TiffBitmapDecoder class:

We loop through the frames to see if any match the system DPI. If there is no exact match, the first frame with a DPI above the system DPI is selected. If there is no such frame, we just pick the frame with the highest DPI.

The code for choosing the BitmapScalingMode is similar – instead of returning an image, we return ‘NearestNeighbour’ if there is an exact DPI match or ‘Unspecified’ otherwise. If you want to use a different BitmapScalingMode fallback, you can specify an optional second paramater in MultiDPIImageScalingMode:

Drawbacks

  • Images set with the markup extension will not be visible in the WPF designer (Visual Studio or Blend). I’d welcome any suggestions on how to fix this.
  • Avoid using PNGOUT or PNGGauntlet on PNG images before putting them into multi-frame TIFF files. The Windows TIFF decoder has some issues with compressed PNGs.

Pixel-perfect Multi-DPI Images in WPF (Part 1)

View source on GitHub.

See also: Part 2 and Part 3.

I’ve written previously about DPI-awareness in the Windows Presentation Foundation and how to specify measurements in pixels rather than Device Independent Units (DIUs). Something else to consider is image scaling – unlike the Windows Ribbon control or WinRT, WPF has no in-built mechanism for displaying different images according to the system’s DPI setting. This is a nuisance.

To illustrate the problem, I created 5 images. Left-to-right, the image DPIs (vertical and horizontal) are: 72, 96, 120, 144 and 192. The image dimensions are: 32x32px, 32x32px, 40x40px, 48x48px and 64x64px. I purposely used single-pixel-wide lines to make any stretching obvious.

Original Images

Read on to see what WPF does with these images.

Continue reading “Pixel-perfect Multi-DPI Images in WPF (Part 1)”

FastPictureViewer Codec Pack, Windows 8 and WPF don’t play nicely together

Update (2012-09-06): After some trial and error, it seems the Canon Hack Development Kit (CHDK) component is causing the issue. If you’re experiencing the same problem, try removing this component.

Update (2012-09-05): The FastPictureViewer support team was unable to reproduce the issue, but suggested it might have something to do with the JPEG Auto-Rotate feature. I was able to resolve the issue by installing only the following components of the codec pack: Photoshop PSD, Lightroom Previews, Adobe DNG, Canon CR2, CRW, PDF Thumbnails and Control Panel. This suggests one of the other components was causing the conflict on my machines.

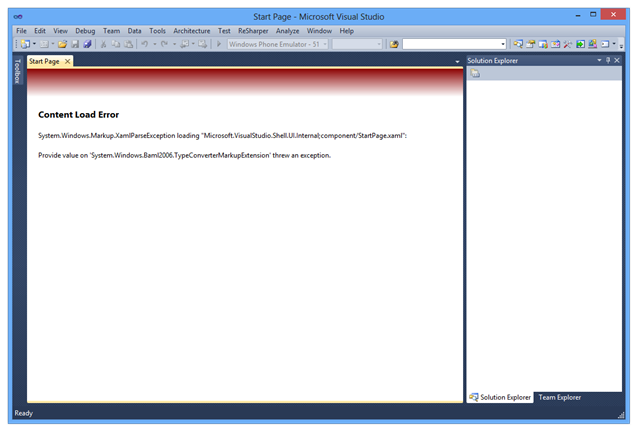
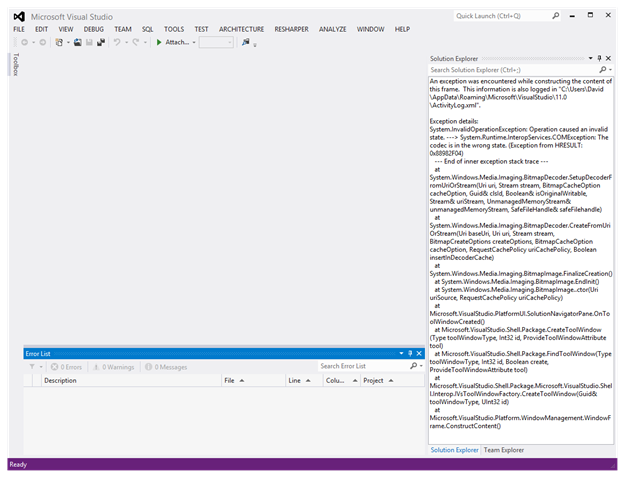
I use the FastPictureViewer Codec Pack for viewing DNG images in Windows Explorer, amongst other things. Unfortunately, however, installing version 3.3.0.69 of the codec pack in Windows 8 (64-bit) caused my installations of Visual Studio 2010, Visual Studio 2012, Blend 4 and Blend for Visual Studio 2012 to stop working to various extents. Both versions of Blend crash silently. The start pages in both versions of Visual Studio fail to load, with VS2010 displaying a ‘Content Load Error’ relating to ‘System.Windows.Baml2006.TypeConverterMarkupExtension’ throwing an exception. The error message displayed where the Visual Studio 2012 Solution Explorer belongs was more useful: ‘System.Runtime.InteropServices.COMException: The codec is in the wrong state. (Exception from HRESULT: 0x88982F04)’.

Uninstalling the codec pack caused everything to start working again. I’ll update this post if/when a future release resolves the incompatibility.

Screenshot of Visual Studio 2010 Error

Screenshot of Visual Studio 2012 Error 

Keiki Usage Meter 3.1.0 Released

I’ve released an update for Keiki Usage Meter. There has been a lot of behind-the-scenes work, but the user experience hasn’t changed drastically. Visit the website to find out what’s new.

I’m using this program as something of a testbed for some engineering work that I’ll talk about in future posts, including supporting pixel-perfect bitmap images at multiple DPI settings in WPF and using the Visual Styles APIs to draw native-looking controls (with animation). I’ve also taken the opportunity to learn a bit about localising programs, and v3.1.0 contains three user interface languages: English (Australia), English (United States) and Japanese (Japan) – thanks to Miho Inaba (稲葉美穂) for help with the latter.

WPF: Using System Colours in Animations

WPF provides access to the Windows system colours through the System.Windows.SystemColors class. As the MSDN documentation indicates, it’s possible to bind to these colours dynamically using the *Key resources, so when the system colours change, so will the appearance of your application.

This code will set the colour of a TextBlock to the ‘GrayText’ system colour, and will change automatically if the user switches themes:

In many cases, there’s no reason not to bind dynamically. Problems arise with animations, however. From MSDN:

You can’t use dynamic resource references or data binding expressions to set Storyboard or animation property values. That’s because everything inside a ControlTemplate must be thread-safe, and the timing system must Freeze Storyboard objects to make them thread-safe. A Storyboard cannot be frozen if it or its child timelines contain dynamic resource references or data binding expressions.

This means that you’re stuck using static references to system colours in your animation storyboards – if the user changes the system colours while your application is running, your storyboards won’t update automatically. Worst-case scenario, you might end up with unreadable text.

I don’t think there are any workarounds that don’t involve reloading windows and/or resource dictionaries (depending on where the style code is located). Reloading a window is easy enough – just be careful if you’re closing your application’s last window: the program will shut down if there are no remaining references to any windows.

The method for reloading a resource dictionary is a bit less obvious. It seems that XAML files accessed by their pack URIs are already compiled, so the system colours will be fixed in place once the program starts up. To get around this, change the build action for the XAML file containing the resource dictionary to ‘Embedded Resource’. You can then (re)build the resource dictionary as you please using XamlReader:

Remove the old resource dictionary from your application’s merged resource dictionaries, then add the new one.

Creating a new resource dictionary like this seems to be fairly slow, so try to avoid doing it on a regular basis. To tell when the Windows theme or system colours have changed, you’ll need to listen for the window messages WM_THEMECHANGED and WM_SYSCOLORCHANGE. See this post for information about listening for window messages in WPF.

When should a program’s UI animations be disabled?

Modern frameworks like the Windows Presentation Foundation, its relative Silverlight and the upcoming Windows Runtime make it easy to add animations to a program’s graphical user interface. When implemented well, animations subtly improve the user experience and can demonstrate a high level of polish in your application. The Zune client software and Windows Live Messenger both feature beautiful animations – coincidentally, both were written with internal Microsoft frameworks (Iris and ‘DirectUI’, respectively; the second is apparently unrelated to anything in WinRT). The Twitter client MetroTwit shows what can be done in WPF (its interface was inspired by the Zune software and the Metro design language).

There are times, however, when animations may become detrimental to the user experience. Animations may appear choppy on lower-end or older systems (especially with heavy frameworks like WPF), and in general they should be disabled entirely for Remote Desktop Connection sessions (only very fast networks with low latency may be able to handle them). Jossef Goldberg from the Visual Studio team has written about the efforts made to bring the performance of Visual Studio 2010 over remote connections up to par, and while his advice is mainly about WPF, the same principles apply to other frameworks, also.

So, how can we decide whether animations should be disabled or not? The answer will likely vary from project to project, but there are a few things that we can do:

1. Check if the program is running in a remote session

In Win32, use the GetSystemMetrics function to get the SM_REMOTESESSION metric (a non-zero result means it is a remote session). In WPF, use the SystemParameters.IsRemoteSession property in the System.Windows namespace. In Windows Forms, use the SystemInformation.TerminalServerSession property in the System.Windows.Forms namespace.

2. Check if animations are enabled in Windows

Windows Vista introduced many new animations to common controls like buttons (notice the smooth glow effect and compare it to the binary states found in Windows XP). Regrettably this change made most owner-drawn implementations look shoddy since they mostly lack animation (e.g. buttons in Firefox), but that’s a topic for another post.

Anyway, these animations can be switched off in the following dialog (aside: the list box was mercifully increased in size in Windows 7, though the window still isn’t resizable):Performance Options Screenshot
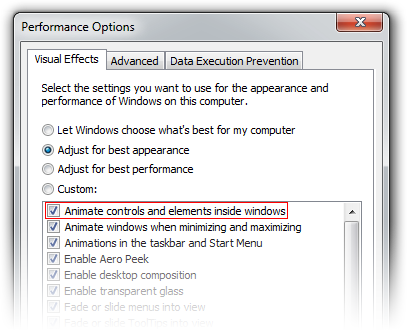
If the user has disabled animations here, it’s probably a good idea to respect that choice in any program you write. We can use the SystemParametersInfo function with the SPI_GETCLIENTAREAANIMATION parameter to check the system setting (or use the SystemParameters.ClientAreaAnimation property in the System.Windows namespace, but note that this always returns true in Windows XP). This only applies to Windows Vista and later.

3. WPF-only: Check the graphics rendering tier

The RenderCapability.Tier property in the System.Windows.Media namespace gives an indication of the graphical capabilities of the system. There are currently 3 tiers, and while the exact meaning may change between .NET releases (as it did in .NET 4.0), this property can be used to help determine what animations, if any, should be enabled.

4. Ask the user!

It can’t hurt to give the user a choice about animations. The remote session checks described above will work for RDP, but there are other technologies available, and we don’t want to punish VNC users by invalidating the entire window 60 times per second for some fancy animation, even if we can’t tell that they’re connecting remotely. If exposing such an option in the UI doesn’t make sense, at least offer it as a command line switch.

Addendum (2011-11-20)

Snooping around PresentationFramework.Aero.dll in .NET Reflector, I happened to come across the ‘Animates’ property in the ButtonChrome class (Microsoft.Windows.Themes namespace):

Similar properties can be found in the other *Chrome classes. Checking the computer’s power status isn’t something covered in this article, but it’s certainly a good idea.